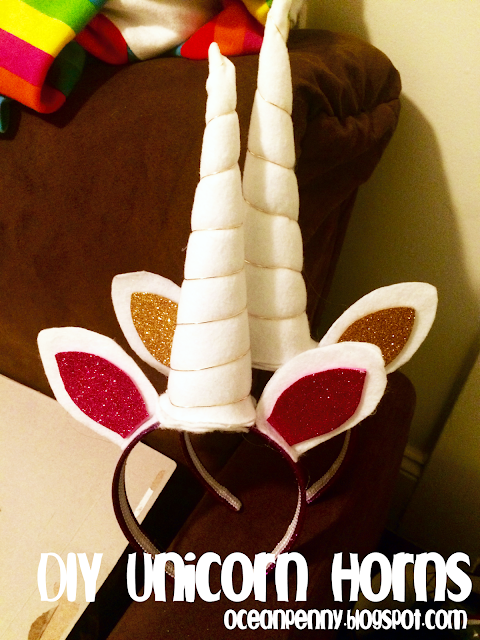
DIY Unicorn Horns
With Bay to Breakers coming up, my group decided upon a group of unicorns (which apparently is called a blessing of unicorns, who knew). We suffered from a lack of planning, making it too late to order affordable things online. And to my surprise, it was actually really difficult finding unicorn things at costume stores. Tasked with outfitting nine unicorns, five of us girls decided to have an arts and crafts night and make it on our own! Most of the credit can be given to this awesome tutorial here (pinterest is awesome). The unicorn horns also ended up being about $5 per person (a steal considering the cheapest on Amazon were $10) and we spent about 3 hours making 9 horns.
You'll need these materials:
- headbands: I found sparkly purple/pink ones in the clearance section for $1 a piece
- stuffing: ~$3 for a big pack, to stuff the horns
- white soft felt: We had a dark unicorn, so I also got black felt. You'll need roughly 1.5 sheet per horn. You'll need two ears and then 2/3 of a sheet for the horn itself.
- white stiff felt: Cut out two for the back of the ears, to give structure.
- light pink/gold/pink sparkly foam/felt: Cut out two smaller pieces for the inner ears
- Gold wire: The tutorial I linked to used gold ribbon, but we found the gold wire to be much more effective in holding the shape.
- A glue gun
First, we used an old cereal box and made a template for our ears. You'll need two sizes, one for the ear itself, and one for the inner ear. For each horn, cut out 2 ears from the stiff white felt, 2 ears from the soft white felt, and 2 of the inner ear from the colorful felt. Glue the three together (stiff to white soft to colorful felt), but leave a small rectangular region of the bottom unglued. We'll cut about half and inch of the colorful foam off and splay the bottom to adhere to the headband.
 |
| The mass production unicorn horn factory |
Next up was the horn itself- which was quite a scary task. Watching the video is best, but basically take the corner and roll it into a cone. Once I rolled about 2/3 of the white felt, I cut off the remainder and hot glue gunned the edges. Pro tip: make sure there's no holes at the top or else stuffing will come out. Once you've glued the top, stuff the cone with stuffing. A chopstick was useful for getting it into the tip. Use your cone to trace a circle of felt to glue to the bottom of the horn. Use your glue gun and trace the edges of the circle and glue the bottom on (and try not to burn yourself and glue your fingers like I sometimes did).
Then, take the gold wire, starting from the bottom, and tightly wrap the wire around the horn so that it pinches the horn. Use your glue gun to glue the start (the bottom) and the end (the tip) so that it stays. If not, your wire could loosen.
Almost done! Now find the center of the headband and glue the horn in the middle. Cut another circle, similar to before, and glue it to the headband and the horn for extra security. Take each of the ears, spread the stiff white felt and the soft white felt about half an inch, and glue it down to the headband, trimming the excess foam if necessary.
And ta dah! The finished product!
 |
| The Unicorn Gang, each unicorn unique but tied together by our matching horns :) |


Comments
Post a Comment